

How to Build a Cat Enclosure – Step-by-Step Guide
A cat enclosure is one of the best things you can give an indoor cat. It offers fresh air, natural stimulation and the freedom to roam outside safely – without the risks of an unsupervised garden. With BOY telescopic poles and a suitable cat net, the enclosure can be assembled and dismantled quickly and adapted to almost any shape or size.
Choosing the Right Cat Net
Not every cat net is suitable for a free-standing enclosure. Do not use transparent nets - they are too stiff and difficult to thread onto poles. All BOY cat nets made from nylon thread work well: the Extra Strong, Standard and Stainless Steel Thread variants. The net should have a braided border at the top and a lead line at the bottom. Choose the mesh size according to your cat – smaller cats need a tighter mesh.
Step-by-Step Assembly
1. Plan the shape and insert lawn holders
Decide on the shape of your enclosure and mark the pole positions. Drive the BOY lawn holders into the ground at regular intervals. Always strike the pipe in the middle – never hit the plate directly or it may break off.
On soft ground, use the extra-long BOY lawn holders (approx. 50 cm) together with telescopic pole extensions. Standard 30 cm holders are not stable enough for soft soil.
2. Insert the lower pole sections
Insert only the lower tube of each telescopic pole into the lawn holder and remove all locking screws – the poles need to slide freely for the next step.
3. Thread the net onto the poles
Thread the cat net onto the lower pole sections before raising them. Thread within a vertical row of stitches, not across them. Allow approximately 40 cm of net to lie flat on the inside of the enclosure before threading the first stitches – this becomes the floor layer that prevents escaping underneath.
Threading through approximately 5 meshes every 30 cm is sufficient. For BOY telescopic poles with a 19 mm diameter, a mesh width of 30–50 mm allows threading without difficulty.
4. Thread the braided line through the top border
If the net was not pre-fitted by BOY, thread a braided line through the entire top row of stitches before raising the poles. This prevents the net from collapsing inward once upright.
5. Raise the poles to full height
Insert the upper section of each telescopic pole back into the lower tube. Hold the upper bar as you do this – it is shorter than the lower tube and will slide inside if released. Pull it upward together with the net to the desired height, then tighten the locking screw. Use a net tie to fasten the net and braided line together through the hole in the pole head.
6. Secure the bottom edge
The lead line keeps the net pressed to the ground, making it much harder for a cat to lift and escape. Anchor the bottom edge with fixing pegs – the closer together, the more secure. For cats that like to jump at or climb the net, also stabilise the telescopic poles with a braided line and additional fixing pegs.
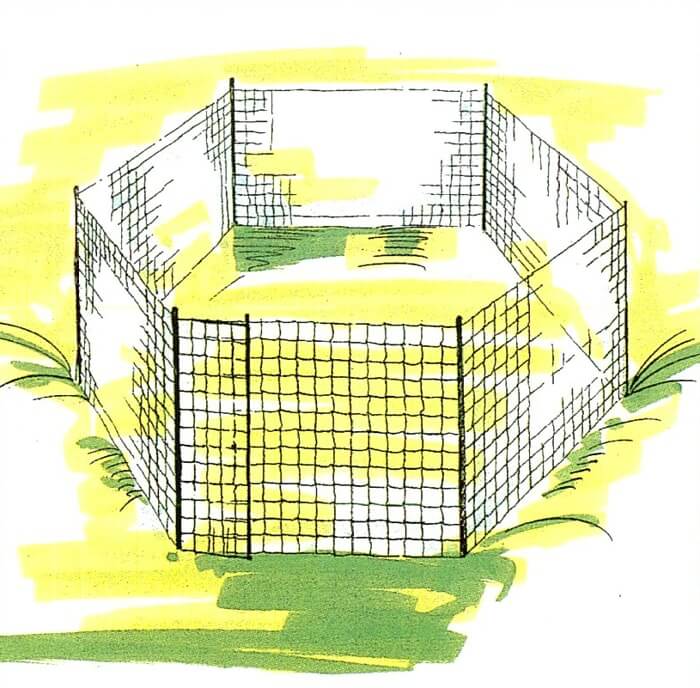
7. Build the entrance correctly
The entrance to the enclosure must overlap as shown in the sketches below. A simple opening without overlap creates a gap that a determined cat will find quickly.
Cat enclosure entrance – correct overlap shown in assembly sketch.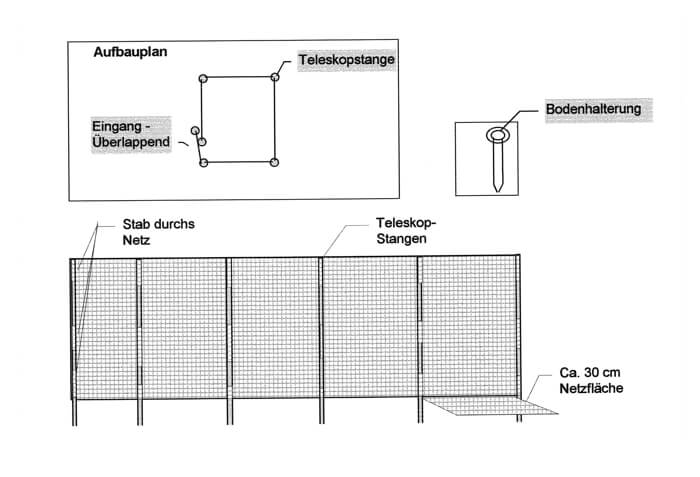
One Thing You Must Never Forget
No matter how well built the enclosure is - always make sure it has adequate shade and that fresh drinking water is available at all times. On warm days, an enclosure in full sun can overheat within minutes.
More Helpful Resources

€14.45 /Piece
Prices incl. VAT plus shipping costs

€24.95 /Piece
Prices incl. VAT plus shipping costs

€8.45 /Set
Prices incl. VAT plus shipping costs

€11.95 /Piece
Prices incl. VAT plus shipping costs

€5.45 /Piece
Prices incl. VAT plus shipping costs

€20.60 - €24.45 /Piece
Prices incl. VAT plus shipping costs

€9.95 - €11.95 /Piece
Prices incl. VAT plus shipping costs